A-Z Guide: Installing n8n Self-hosted on Ubuntu VPS for Beginners
A-Z Guide: Installing n8n Self-hosted on Ubuntu VPS for Beginners
Author: Vinh Automation
Level: Beginner
Time to complete: 30–45 minutes
Part 1: Overview & System Architecture
1.1 Why Self-host n8n?
n8n is one of the most powerful Automation and AI Agent tools available today. However, the Cloud version (n8n.cloud) comes at a high cost and imposes limits on the number of workflows - especially when you need to run many complex automation flows.
Self-hosted n8n on a VPS gives you:
- ✅ Full data control - no third party touches your workflows.
- ✅ Unlimited workflows, executions, and users.
- ✅ Low cost - starting at just $5–10/month for an Ubuntu VPS.
- ✅ Unlimited integrations - freely install custom Python or Node.js packages.
1.2 System Architecture
Here is the architecture you will build:
[Your Computer]                    [VPS Ubuntu]
      │                                    │
      │  MobaXterm (SSH)                   │
      ├─────────────────────────────────►  │
      │                                    │
      │                             ┌──────┴─────────┐
      │                             │  Docker        │
      │                             │  ├─ n8n_app    │
      │                             │  │  (port 5678)│
      │                             │  └─ cloudflare │
      │                             │     _tunnel    │
      │                             └──────┬─────────┘
      │                                    │
      │  HTTPS (via Cloudflare Tunnel)     │
      │  ─── Internet ───► Cloudflare ◄────┘
      │                        │
      │  https://n8n.your-domain.com
      │◄───────────────────────┘
Overall architecture - MobaXterm connects via SSH to VPS, n8n and Tunnel run inside Docker, users access through Cloudflare Tunnel with auto HTTPS
How it works:
- You use MobaXterm (SSH client) to connect and manage the Ubuntu VPS.
- Docker runs 2 containers:
n8n_app(handles workflows) andcloudflare_tunnel(creates a secure tunnel). - Cloudflare Tunnel establishes a secure connection from VPS to Cloudflare Edge, no ports need to be opened on the VPS.
- Users access n8n via
https://n8n.your-domain.com- HTTPS is auto-provisioned by Cloudflare.
Part 2: Step-by-Step Guide
Prerequisites
Before starting, make sure you have:
| Tool | Requirement | Notes |
|---|---|---|
| Linux VPS | Ubuntu 22.04 or 24.04 LTS, 1–2 vCPU, ≥2GB RAM | Global market: DigitalOcean, Vultr, Hetzner, Linode (USD billing, suitable for global content). In Vietnam: VPS Vietnam ⚡ — VND billing, easy payment, fast support, I use this one. |
| Domain name | DNS managed by Cloudflare | Example: vinhautomation.com |
| MobaXterm | Latest version (download from mobaxterm.mobatek.net) | Free version is enough, Portable version recommended |
| Cloudflare account | Free plan is sufficient | Sign up at cloudflare.com |
Step 1: First VPS Connection via MobaXterm
MobaXterm is a powerful VPS management tool with a visual interface. This is the first and most important step for beginners.
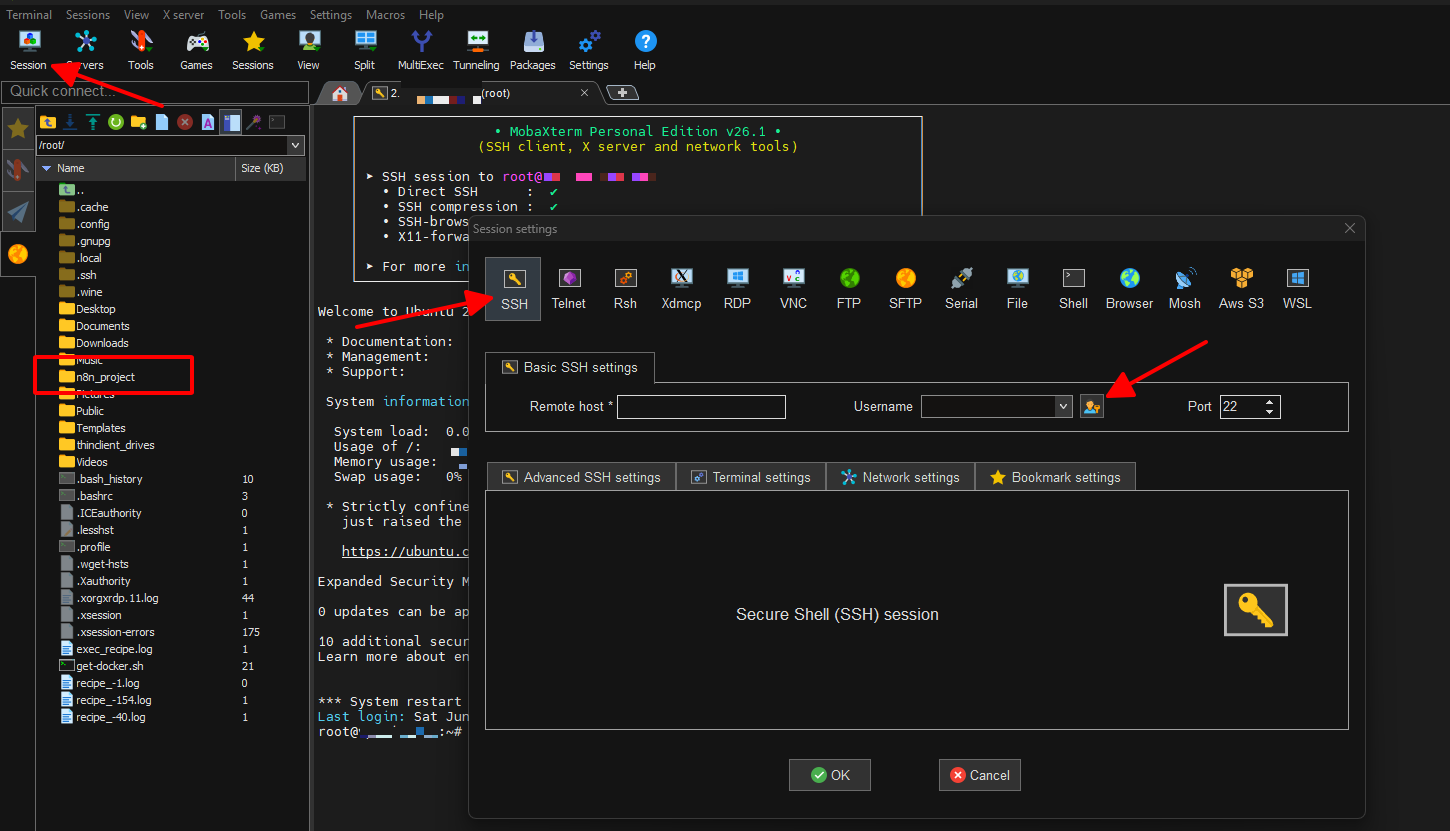
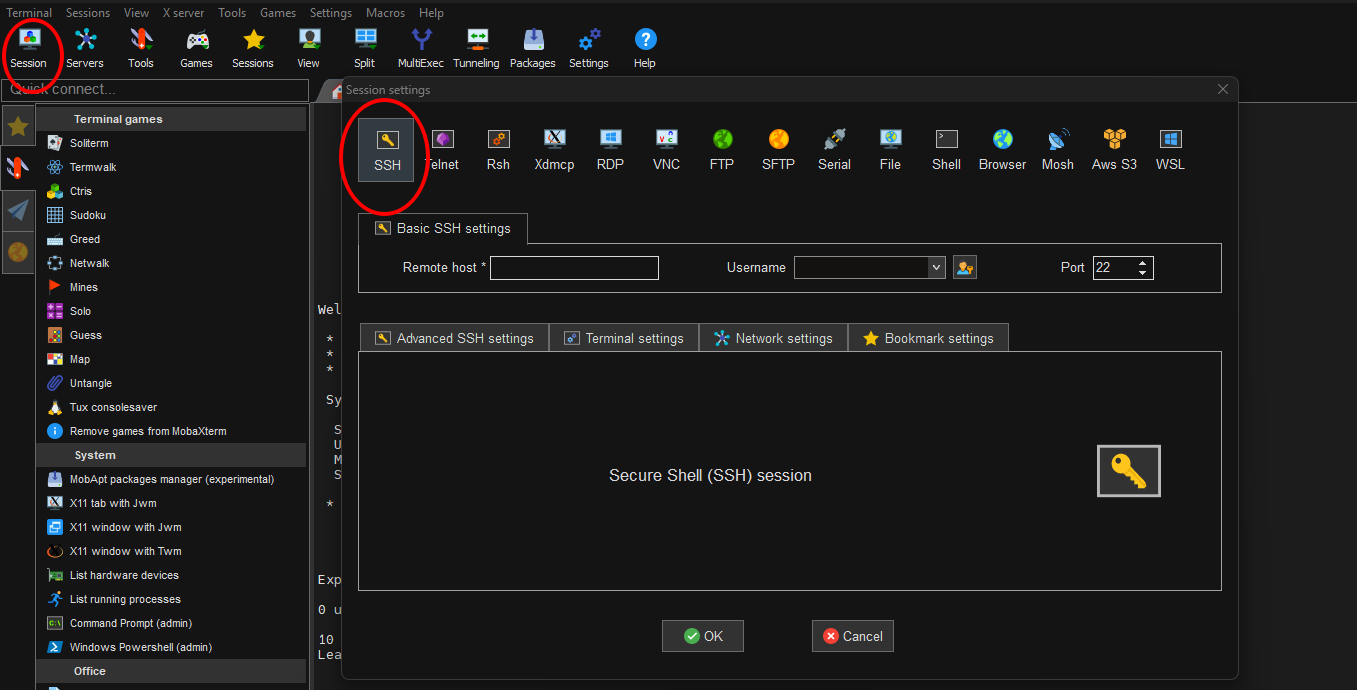
Creating an SSH Session in MobaXterm — enter VPS IP and root username
- Open MobaXterm → click the Session button (top-left corner).
- Select SSH.
- Fill in the details:
- Remote host: Your VPS IP address.
- Check Specify username → enter
root.
- Click OK.
Time-saving tip: After logging in successfully, save the session so you never have to type the password again:
- Look at the Sessions column on the left → right-click on empty space.
- Select Add current terminal as a session → OK.
Then, right-click the saved session → Edit session:
- In the Username field (
root), click the person icon (next to the golden key). - Click New → enter Username
rootand paste your VPS password → OK.
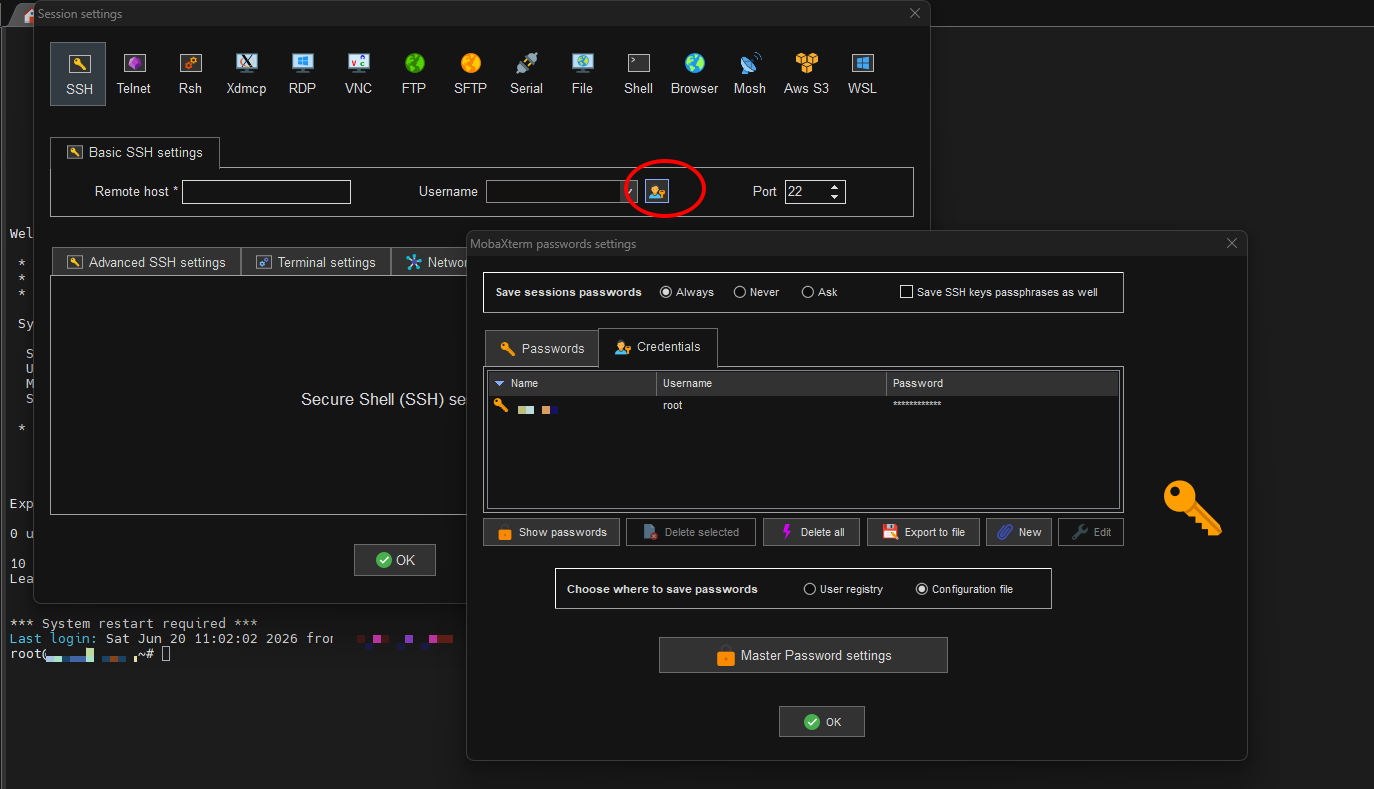
MobaXterm Password Settings — click New to add a credential, from now on just double-click to enter the VPS directly
From now on, simply double-click the session to get straight into the terminal. No more typing passwords.
Step 2: Install Docker & Docker Compose
Run the following block of commands in the MobaXterm terminal to install Docker:
# Step 2a: Update the system
sudo apt update && sudo apt upgrade -y

# Step 2b: Install supporting packages
sudo apt install apt-transport-https ca-certificates curl gnupg lsb-release -y

# Step 2c: Download and run the official Docker install script
curl -fsSL https://get.docker.com -o get-docker.sh && sudo sh get-docker.sh

# Step 2d: Enable Docker to start on boot
sudo systemctl enable docker && sudo systemctl start docker
Command breakdown:
| Command | Purpose |
|---|---|
apt update && apt upgrade | Update package lists and upgrade all software on the VPS — prevents dependency issues later. |
apt install ... curl gnupg ... | Install necessary tools to download and verify Docker packages. |
curl ... get.docker.sh && sh get-docker.sh | Official script from Docker Inc. — auto-detects the OS and installs the correct version. |
systemctl enable docker | Ensures Docker restarts automatically after a VPS reboot. |
Verify: run docker --version — if you see a version number (e.g., Docker version 27.x.x), it worked.
Step 3: Launch the n8n Container
Run the following command to pull the n8n image and start it:
docker run -d \
  --name n8n_app \
  --restart always \
  -p 5678:5678 \
  -v n8n_data:/home/node/.n8n \
  n8nio/n8n:latest
Detailed parameter breakdown:
| Parameter | Meaning |
|---|---|
-d | Run in detached mode — the terminal is not occupied. |
--name n8n_app | Name the container n8n_app for easy management. |
--restart always | Auto-restart if the container crashes or the VPS reboots. |
-p 5678:5678 | Map port 5678 on the VPS to port 5678 inside the container. |
-v n8n_data:/home/node/.n8n | Volume storing workflow data — most important: when you delete the container, your data is safe. |
n8nio/n8n:latest | Official n8n image, always the latest version. |
http://IP-VPS:5678. Do NOT work through this address because:
- HTTP protocol — passwords and tokens are sent as plain text.
- Port 5678 is publicly open — hacker bots will scan and attack immediately.
Step 4: Create a Secure Cloudflare Tunnel
Instead of opening ports for hackers, Cloudflare Tunnel creates a private tunnel from your VPS directly to your domain.
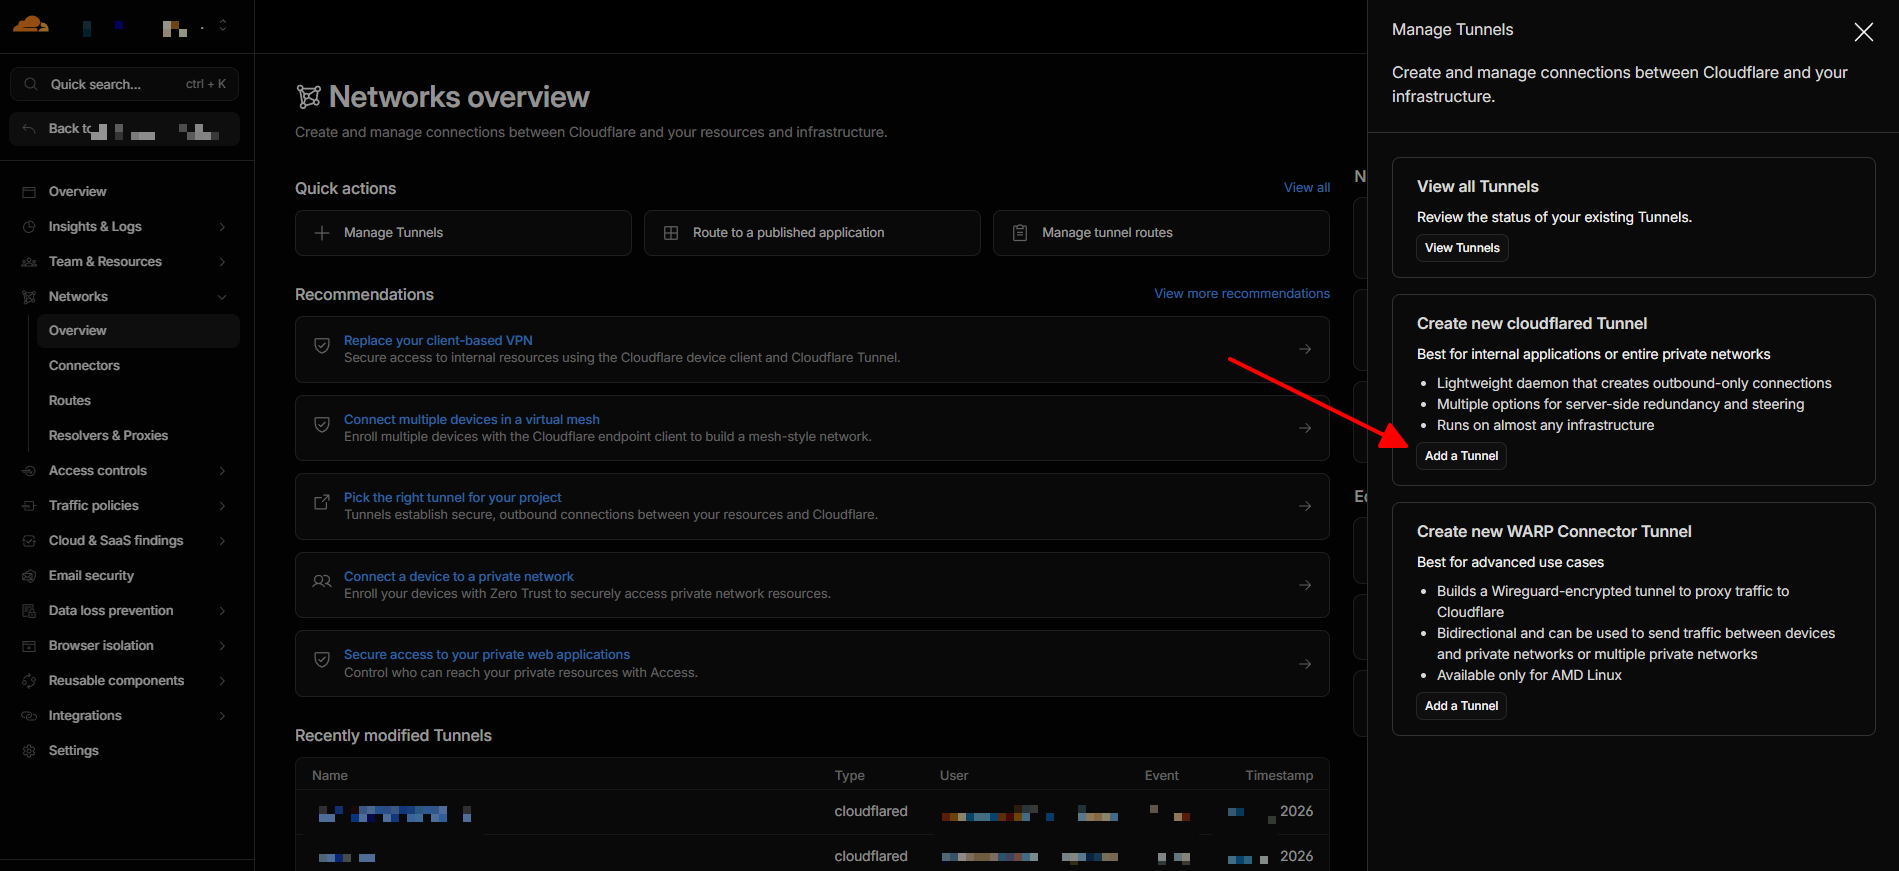
Cloudflare Zero Trust interface — go to Networks → Tunnels to create a new tunnel
4.1. Get your Token from Cloudflare:
- Go to Cloudflare Zero Trust → Networks → Tunnels.
- Click Create a tunnel → give it a name (e.g.,
n8n-tunnel) → Save tunnel. - On the Choose your environment screen, select Docker.
- Copy the long string after
--token— that is your Token.
4.2. Activate the Tunnel on your VPS:
Back in MobaXterm, run this command (replace <YOUR_TOKEN> with the token you just copied):
docker run -d \
  --name cloudflare_tunnel \
  --restart always \
  cloudflare/cloudflared:latest \
  tunnel run --token <YOUR_TOKEN>
Explanation:
cloudflare/cloudflared:latest— the official Cloudflare Tunnel image.tunnel run --token <TOKEN>— command to connect to the Cloudflare Edge using the authentication token. The token must be at the end of the command, never at the beginning.
--token parameter must be at the end of the Docker command. If placed before tunnel run, Cloudflare will mistake it for the old certificate-based mechanism (cert.pem) and throw an "Error locating origin cert" error.
Step 5: Point Your Domain & Finish
-
In the Cloudflare Zero Trust interface (still on the tunnel config page), click Next.
-
Go to the Public Hostname tab → click Add a public hostname.
-
Fill in the details:
- Subdomain:
n8n - Domain:
vinhautomation.com(your domain) - Type:
HTTP - URL:
n8n_app:5678
- Subdomain:
-
Click Save hostname.
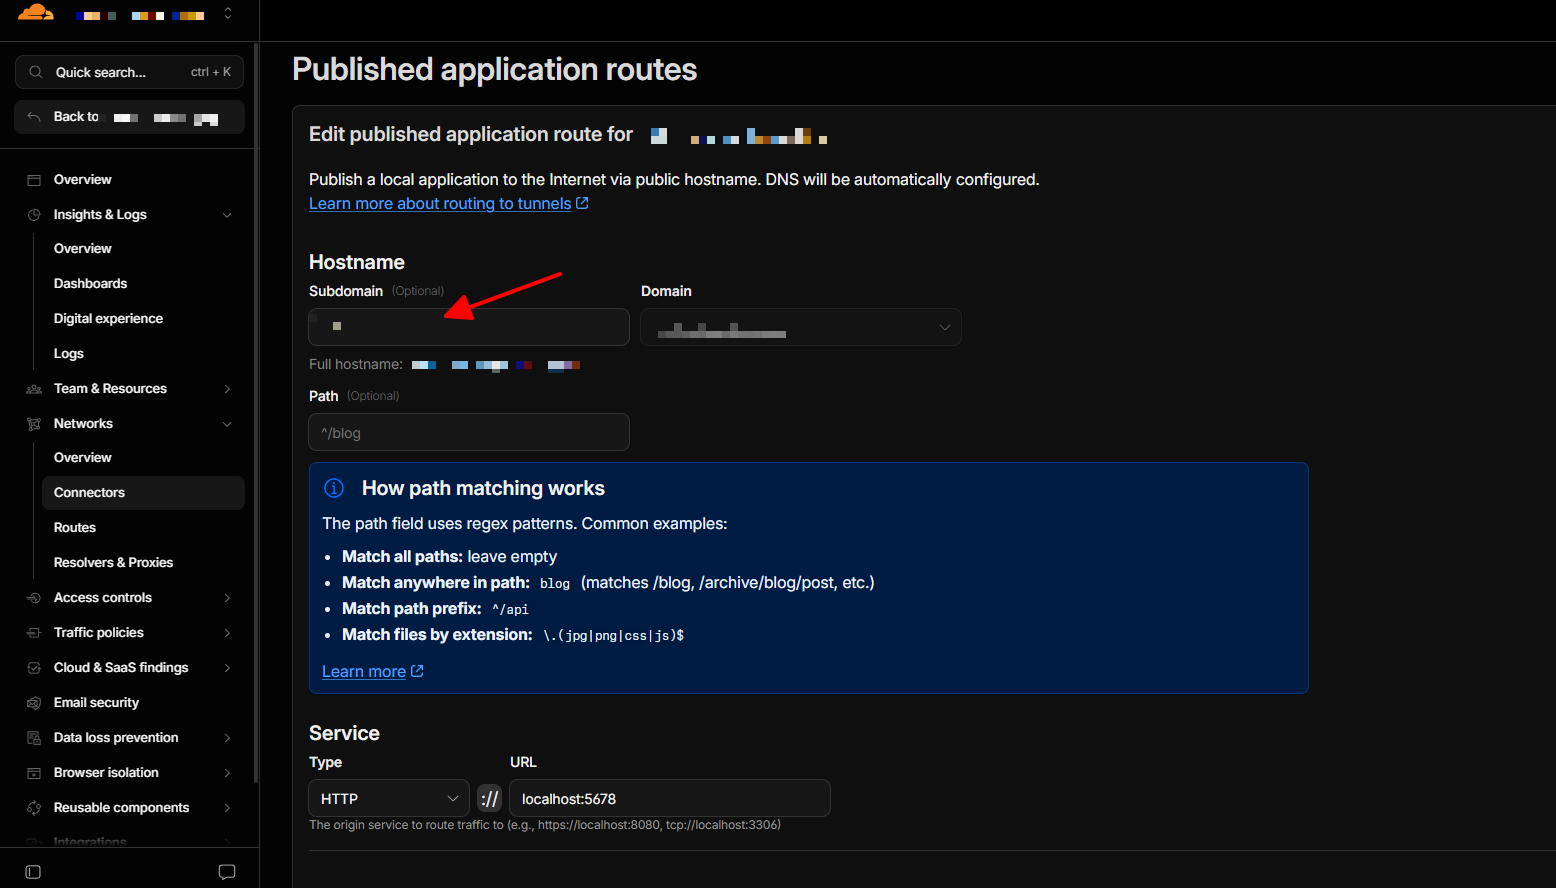
Public Hostname config — subdomain n8n, URL pointing to n8n_app:5678
Verify the connection:
docker logs cloudflare_tunnel --tail 10If you see INF Connection registered or HTTP/2 connection successful, it worked.
Step 6: Register the n8n Admin Account
Open your browser and go to:
https://n8n.your-domain.comYou will see the first-time admin registration screen for n8n. Enter your email and password (save them carefully) and start using it.
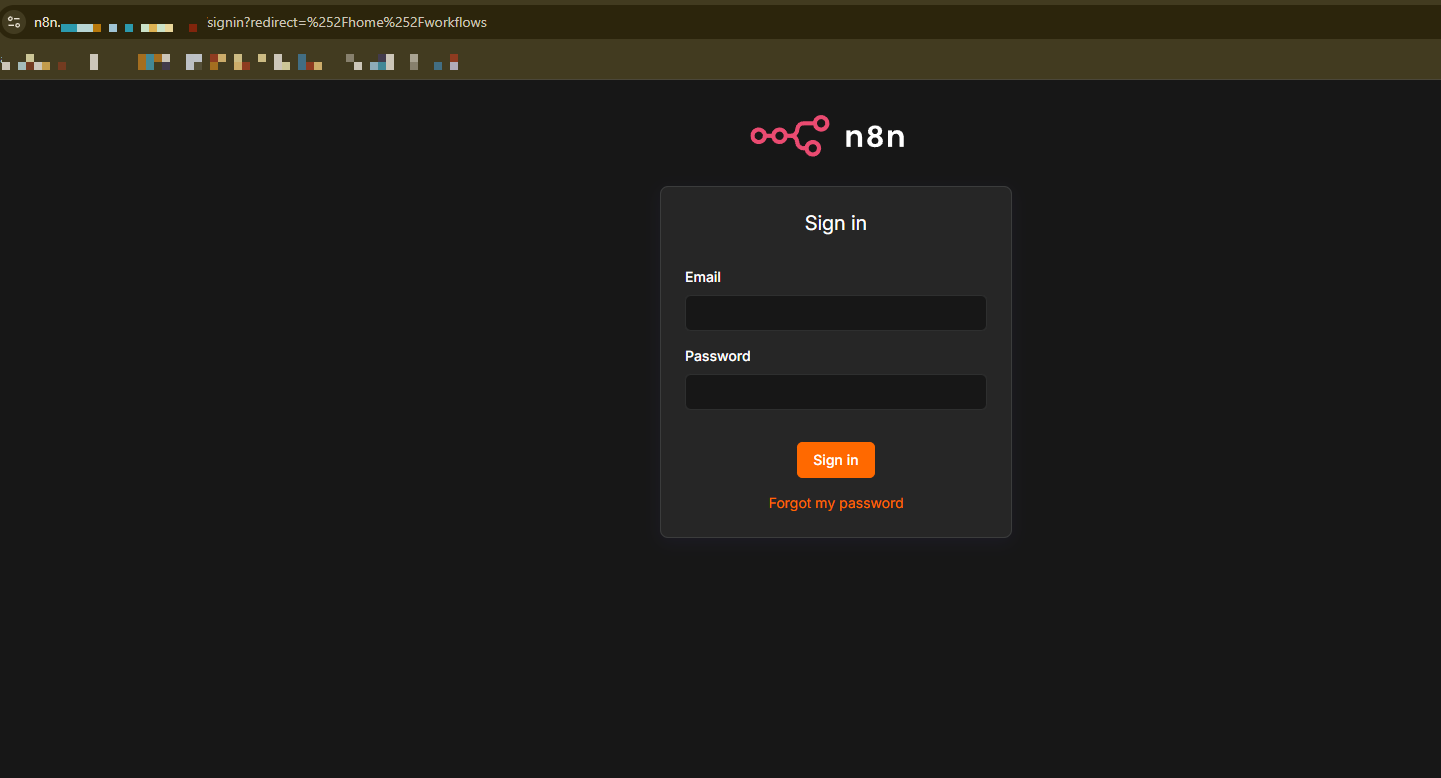
First-time admin registration page — appears when accessing n8n for the first time via HTTPS, the SSL certificate is auto-provisioned by Cloudflare
Part 3: Troubleshooting & Best Practices
3.1 Common Setup Errors
| Error | Cause | Solution |
|---|---|---|
| SSH: Permission denied (password) | Wrong password or VPS does not allow root login via password | Go to VPS Console (via web hosting) → edit /etc/ssh/sshd_config → set PermitRootLogin yes → systemctl restart sshd |
| Docker: Cannot connect to Docker daemon | User not added to docker group | Run sudo usermod -aG docker $USER, log out and log back in |
| Port 5678 already in use | Old container not removed | Run docker rm -f n8n_app then re-run the start command |
| Cloudflare Tunnel: 404 Not Found | Wrong URL in Public Hostname | Go to Tunnel → Edit → change URL to n8n_app:5678 |
| Error: Error locating origin cert | Token placed in wrong position in Docker command | Make sure token is after tunnel run --token |
3.2 Debugging Checklist
# 1. Is Docker running?
docker ps -a

# 2. Any n8n app logs?
docker logs n8n_app --tail 20

# 3. Is the Tunnel connected?
docker logs cloudflare_tunnel --tail 20

# 4. Try curl n8n internally
curl -I http://localhost:5678

# 5. Check data volume
docker volume inspect n8n_data
3.3 Best Practices from Day One
🔒 Security
- Do NOT open port 5678 to the internet — use Cloudflare Tunnel only.
- Set a strong n8n Admin password (at least 12 characters with special characters).
- Update Docker images regularly:
docker pull n8nio/n8n:latest && docker rm -f n8n_app && docker run ...
⚡ Performance
- Use a VPS with 2GB RAM or more — n8n with AI workflows is memory-intensive.
- Set up SWAP (see Article 2) to prevent crashes under load.
- Limit Docker logs (see Article 2) to avoid filling up the disk.
🏗️ Architecture
- Use a dedicated volume for n8n_data — do not use bind mounts to regular folders.
- Label your containers:
docker run ... --label "project=n8n-production"for easier management. - Back up your volume regularly — workflows are valuable assets.
Conclusion
You have successfully installed n8n Self-hosted on an Ubuntu VPS with Docker and Cloudflare Tunnel. The entire process took only 6 steps and less than 45 minutes.
What you accomplished:
- ✅ Connect and manage your VPS via MobaXterm with permanent password saving.
- ✅ Install Docker and launch the n8n container.
- ✅ Set up a secure Cloudflare Tunnel — no open ports, auto HTTPS.
- ✅ Point your domain and register the Admin successfully.
🚀 Next steps: Your system is just the foundation. To keep n8n running smoothly for months without crashes, you need to optimize RAM, limit logs, automate cleanup, and know how to fix 502/1033 errors in real-world scenarios. All of this is covered in the next article.
📖 Related articles: